Object and Light Properties
Object and Light Properties Overview
In addition to the settings in the Render dialogue, which are global for the scene, you can set different render settings on a per-object basis. Some of those properties (primary and secondary visibility, visibility to camera, etc.) are accessible through the normal 3ds Max object properties page. V-Ray also defines some additional properties which can be accessed by pressing the Object settings or Light settings button in the System roll-out.
Object Properties
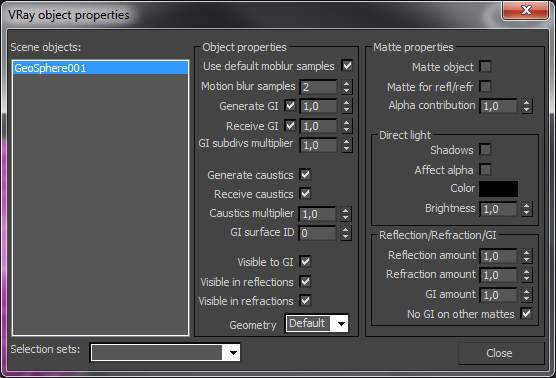 V-Ray supports per object control of motion blur, indirect illumination, and shadow/matte properties. On the left is a list of all objects in the scene and on the right are the properties. You can select multiple objects. There is also a list of MAX selection sets to make the interface more convenient and efficient.
Use default moblur samples - when this checkbox is selected, the Geometry Samples value will be taken from the global Motion blur roll-out. When this is off, the number of geometry samples is taken from the Motion blur samples parameter below.
Motion blur samples - here you can set the number of geometry samples for the selected objects, if Use default moblur samples is off.
Generate GI - this setting controls whether the object(s) will generate indirect illumination. You can supply a multiplier for the generated indirect illumination.
Receive GI - this setting controls whether the object(s) will receive indirect illumination. You can supply a multiplier for the received indirect illumination.
GI subdivs multiplier - this is a multiplier for the subdivisions of the GI calculated for the current surface
Generate caustics - when this setting is checked the selected objects will refract the light coming from light sources that are caustics generators, so that caustics are produced. Note that in order to generate caustics, an object must have a reflective or refractive material.
Receive caustics - when this setting is checked the selected objects will become caustic receivers. When light is refracted by objects that generate caustics the resulting caustics will be only visible when they are projected on caustics receivers.
Caustics multiplier - this value is a multiplier for the caustics received by the selected object(s). Note that this value has no effect unless Receive caustics is checked.
GI surface ID - this number can be used to prevent the blending of light cache samples across different surfaces. If two objects have different GI surface IDs, the light cache samples of the two objects will not be blended. This can be useful to prevent light leaks between objects of vastly different illumination.
Visible to GI - when this is off, the object will be considered perfectly transparent to GI rays.
Visible in reflections - when this is off, the object will appear perfectly transparent to reflection rays.
Visible in refractions - when this is off, the object will appear perfectly transparent to refraction rays.
Geometry - this parameter allows the user to override the Default Geometry parameter in the System roll out on a per object level.
-
Static - the geometry is precompiled into an acceleration structure at the beginning of the rendering and remains there until the end of the frame. The static raycasters are not limited in any way and will consume as much memory as necessary.
-
Dynamic - the geometry is loaded and unloaded on the fly depending on which part of the scene is being rendered. The total memory taken up by the dynamic raycasters can be controlled by the Dynamic memory limit parameter.
-
Default - the option set in the Default Geometry parameter is used.
Matte Properties
V-Ray does not completely support the Matte/Shadow material of 3ds Max. However, V-Ray has its own matte system. You can control matte properties either on an object level through the Object settings dialog, or on a material level through the special VRayMtlWrapper material.
Matte object - checking this option will turn the object into a matte object. This means that the object will not be directly visible in the scene; instead, the background color will be shown in its place. However, the object will appear normally in reflections/refractions and will generate indirect illumination based on its actual material.
Alpha contribution - this allows you to control how the object will appear in the alpha channel. Note that this parameter does not require the object to be a matte object - this parameter has an effect on all objects. A value of 1.0 means that the object will appear normally in the alpha channel. A value of 0.0 means that the object will not be present in the alpha channel at all. A value of -1.0 will invert the alpha of the object. Note that turning an object into a matte object does not change its appearance in the alpha channel. You need to explicitly change its alpha contribution.
Direct Light
Shadows - this will make the matte object receive shadows.
Affect alpha - this will cause the shadows to affect the alpha of the object.
Color - the color of the shadows.
Brightness - the brightness of the shadows.
Reflection/Refraction/GI
Reflection amount - if the material of the object is a reflective V-Ray material, this controls how much of the reflection will be visible on the matte object.
Refraction amount - if the material of the object is a refractive V-Ray material, this controls how much of the refraction will be visible on the matte object.
GI amount - this controls how much of the indirect illumination received by the object will be visible on the matte.
No GI on other mattes - this will cause the object to appear as a matte object in reflections, refractions, GI, etc. for other matte objects. Note that if this is ON, refractions for the matte object might not be calculated (the object will appear a matte object to itself and will not be able to "see" the refractions on the other side).
Light Properties
 In this dialogue, you can specify properties of the lights in the scene with regards to caustics and global photon mapping. On the left is a list of light sources in the scenes and on the right are the light settings. You can select multiple light sources. There is also a list of 3ds Max selection sets to make the interface more convenient and efficient.
Generate caustics - when this setting is checked, V-Ray will generate caustic photons for the selected light sources. Note that to obtain the caustics effect you must set the appropriate value for the Caustics multiplier below as well as put some objects that generate caustics in the scene.
Caustic subdivs - this option controls the amount of photons that V-Ray will trace to estimate caustics. Large numbers slow down the calculation of the caustics photon map and may take more memory.
Caustics multiplier - t his value is a multiplier for the generated caustics by the selected object. Note that this multiplier is cumulative - it does not override the multiplier in the Caustics render roll-out section. The multiplier has no effect unless Generate caustics is checked.
Generate diffuse - when this is checked, V-Ray will generate diffuse illumination photons for the selected light sources. See the Global photon map section for more details.
Diffuse subdivs - controls the number of diffuse photons traced for the selected light(s). Larger values mean a more precise photon map, but will take more time and memory.
Diffuse multiplier - a multiplier for the diffuse photons.